

How to Use Cloudflare 1.1.1.1 DNS to Visit Blocked Websites
With the government's oversight over its citizens' internet browsing becoming more and more than 'strict', so to speak, we are hearing more and more about the government cracking downward on websites that they deem 'unfit' for the public to take admission to. The latest example of this is the porn ban that the Indian regime has asked ISPs in the state to implement, and which has already been implemented by a bunch of ISPs and network operators as of this writing.
Autonomously from the issue of banned websites, there's too the trouble that ISPs can easily snoop in on your data, and a lot of DNS providers actually even sell your data to third parties for turn a profit or use it to target you with ads. That'due south non right, and then if you're looking for a simple and straightforward solution to all of these problems, you must've heard of Cloudflare's recently launched one.i.1.1 DNS resolver service. Then, in order to help y'all become the near out of your internet, here'due south how you lot can use Cloudlfare's 1.1.1.1 DNS resolver to secure your DNS queries and visit blocked websites on the internet.
Why Is the one.1.1.ane DNS Resolver Good
If you wondered why Cloudflare'due south i.1.1.1 DNS resolver service is something we're recommending, showtime of all, that'south the proper way of thinking about internet services. Second, the reasons behind us mentioning this service equally a great style to access an unrestricted internet are multifold, let me just break them downward to y'all:
- Cloudflare'southward Privacy Policy explicitly states that they will never sell your data to third parties.
- Cloudflare also states that information technology will never store any of your personally identifiable information, and will also destroy debug logs and similar data records within a 24 hr period.
- The 1.1.one.i service is in partnership with APNIC (the Internet registrar for the Asia Pacific and Oceania region) and is completely free to apply.
- Different VPN services, which might offer similar benefits, there are no usage limits on one.i.1.1 and you don't even demand to register anywhere.
- You can access whatever blocked website with the ane.1.one.1 DNS resolver, and in some cases, you might see your internet speeds improve as well.
How to Use Cloudflare'southward ane.i.1.1 DNS Resolver on Your Devices
Using a different DNS server than what is currently assault your devices might sound like a mammoth job just information technology'southward actually pretty straightforward, and Cloudflare has tried to make information technology fifty-fifty easier, particularly for mobile users. Notwithstanding, instead of leaving you with a link to our article on how to change DNS settings on your system, I'll walk you through how to set upwards the i.1.1.1 DNS on all your devices. So read on.
How to Use Cloudflare 1.one.ane.1 DNS on macOS
Setting upward the 1.1.1.1 DNS resolver on a Mac is pretty easy even if it involves a bunch of steps. Simply follow the steps mentioned below to get one.ane.1.1 up and running on your Mac:
- Open Arrangement Preferences, and search for DNS Servers. From the drop downwardly, select DNS Servers.
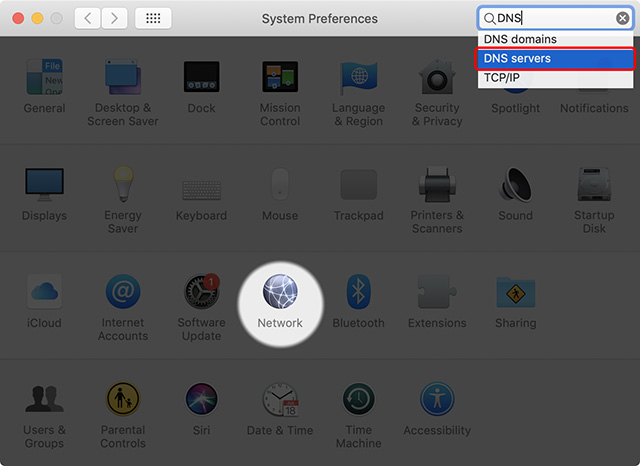
- This will open up up a screen showing you lot the DNS servers on your Mac. Click on the "+" button under DNS Servers and enter one.1.1.1
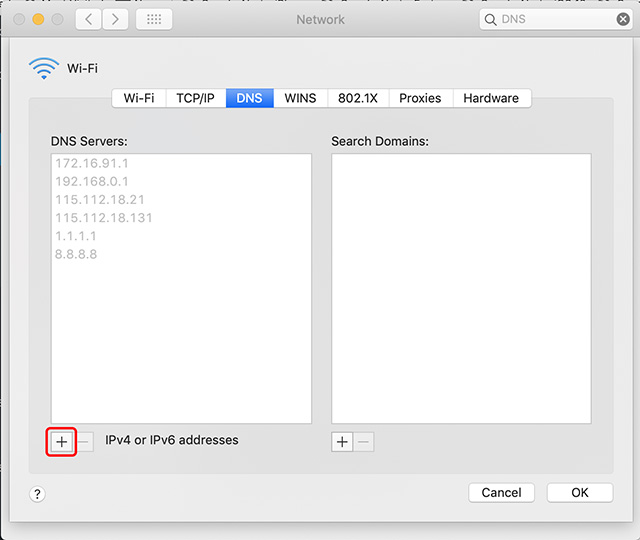
- Click on the "+" push once again, and enter ane.0.0.1
- Click on the "+" button once more, and enter 2606:4700:4700::1111
- Click on the "+" button one more than time, and enter 2606:4700:4700::1001
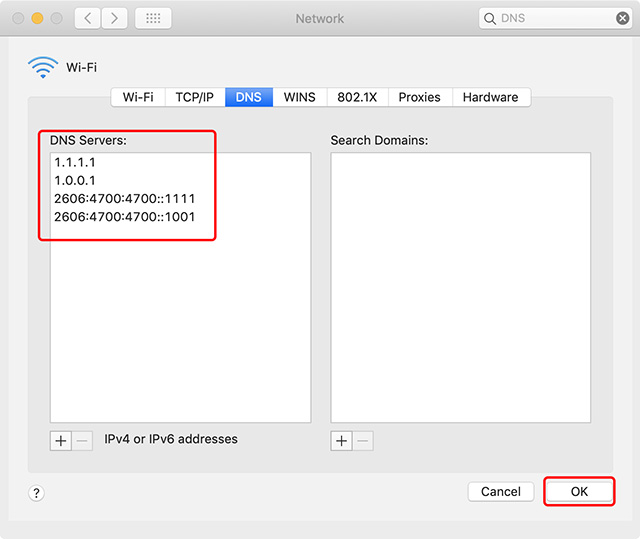
- Click on 'Ok,' and then click on 'Utilize.'
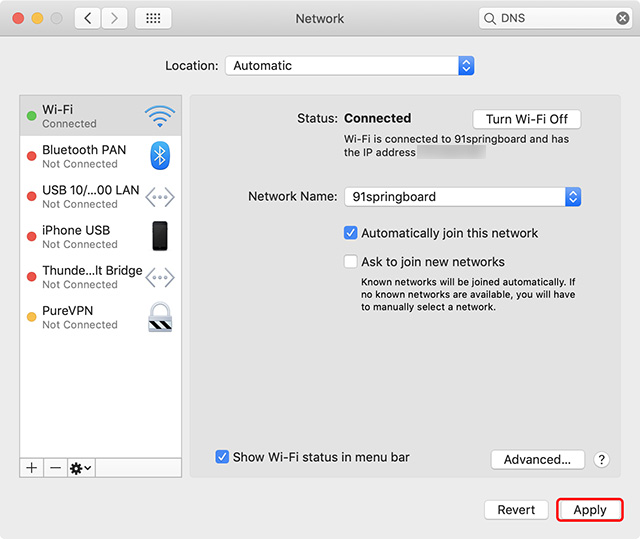
That's pretty much it, you now have the Cloudflare 1.i.1.1 DNS running on your Mac.
How to Use Cloudflare 1.1.1.i DNS on Windows
If you lot're a Windows user and you want to fix the 1.1.ane.one DNS resolver on your system, just follow the steps beneath and you'll be up and running in no time.
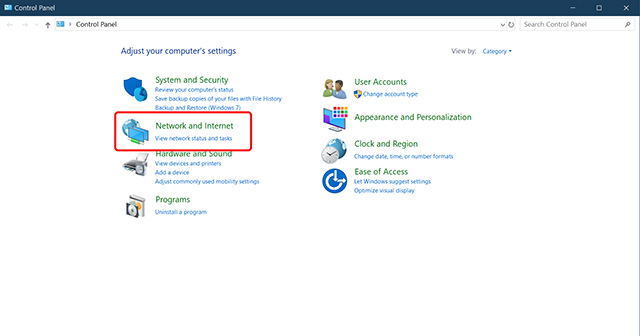
- Open the Control Panel and click on 'Network and Internet.'
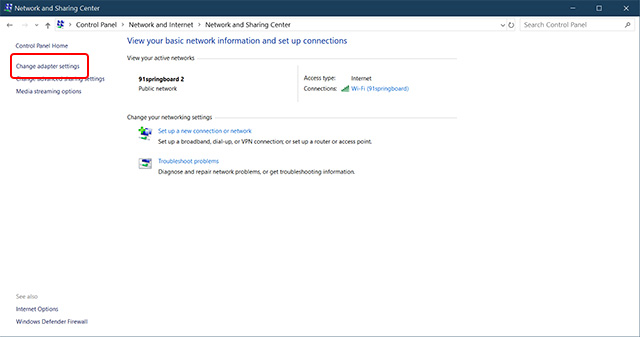
- Go to 'Network and Sharing Eye' and click on 'Change Adapter Settings.'
- Now, right click on the WiFi network you use, and click on 'Properties.'
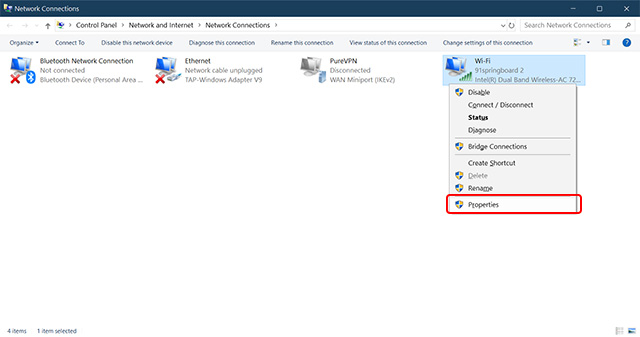
- Select IPv4, and click on 'Properties.'
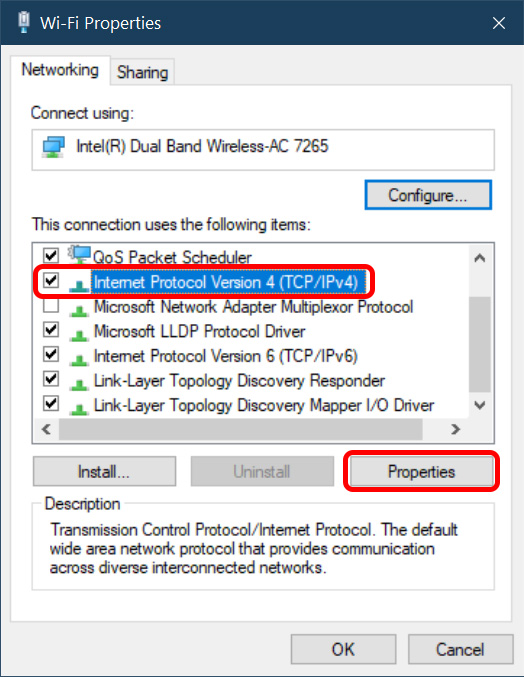
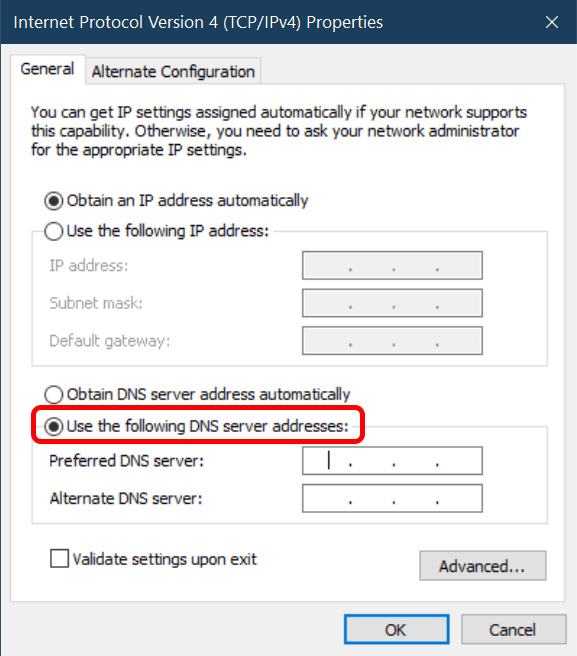
- Click on 'Use The Following DNS Server Addresses.'
- Replace the addresses with 1.1.1.1 and i.0.0.i
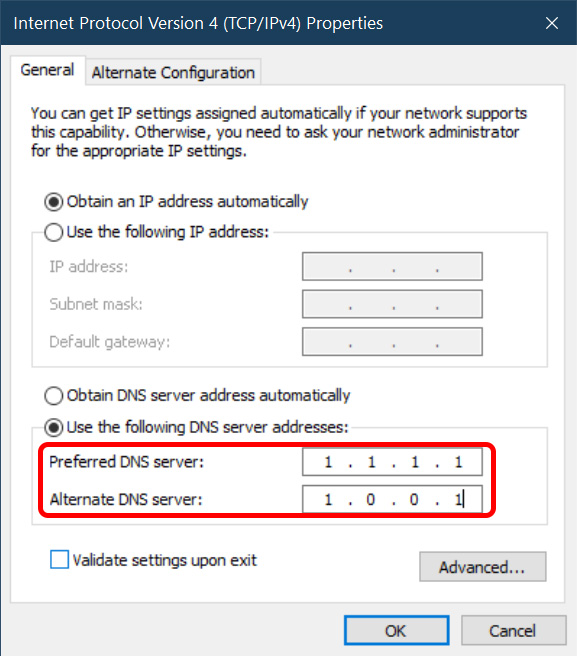
- Once done, click on 'Ok' and then click on 'Close.'
At present you but have to restart your browser and that's it, your organisation will exist using the i.1.one.1 DNS resolver.
How to Use Cloudflare i.one.1.1 DNS on iPhone
Using the Cloudflare ane.one.1.1 DNS on iPhone is pretty straightforward, and there are really 2 methods that you can use depending on what you lot're comfortable with.
Use Cloudflare 1.1.ane.1 DNS on iPhone with the Cloudflare DNS App
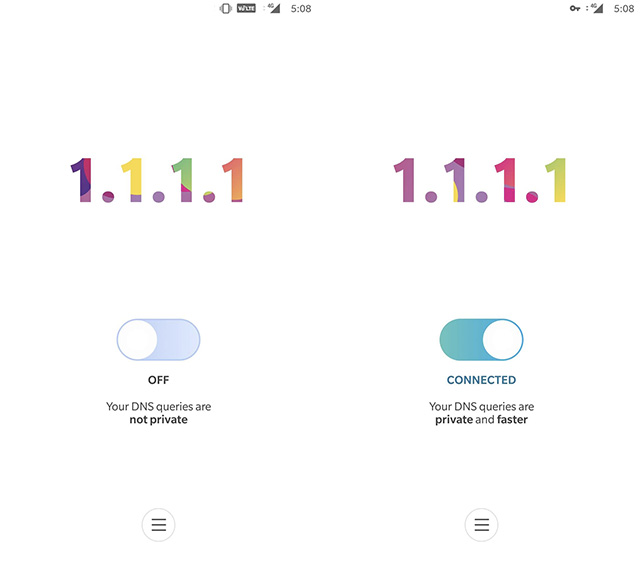
The easiest method to apply the 1.1.1.1 DNS service on iOS is to simply use the dedicated app that Cloudflare has released for iOS. It works pretty much like a VPN app and routes all your net traffic via the one.1.1.1 DNS while the app is active.
- Install the 1.1.1.1 DNS app on your iPhone from the App Store.
- One time done, just launch the app, allow it to create a VPN profile and toggle the VPN on.
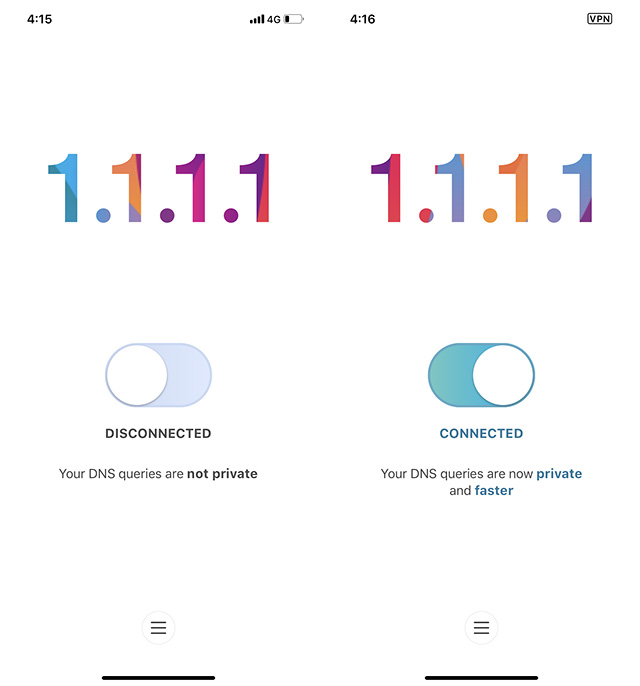
That's it. All your network requests will now be routed through the 1.1.ane.1 DNS.
Employ Cloudflare 1.1.i.1 DNS on iOS by Changing DNS Settings
Alternatively, you lot tin edit the DNS settings on your iPhone to not have to turn on the DNS app everytime you need unblocked access to the internet. Here's how you can do that.
- On yous iPhone, head over to Settings, and tap on WiFi. Hither, tap on the WiFi network yous're using.
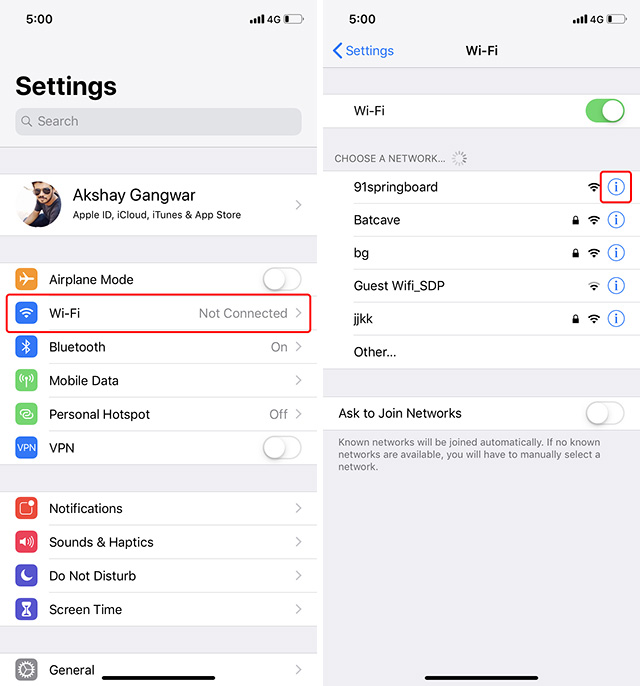
- Within the settings, tap on Configure DNS, and so tap on Transmission.
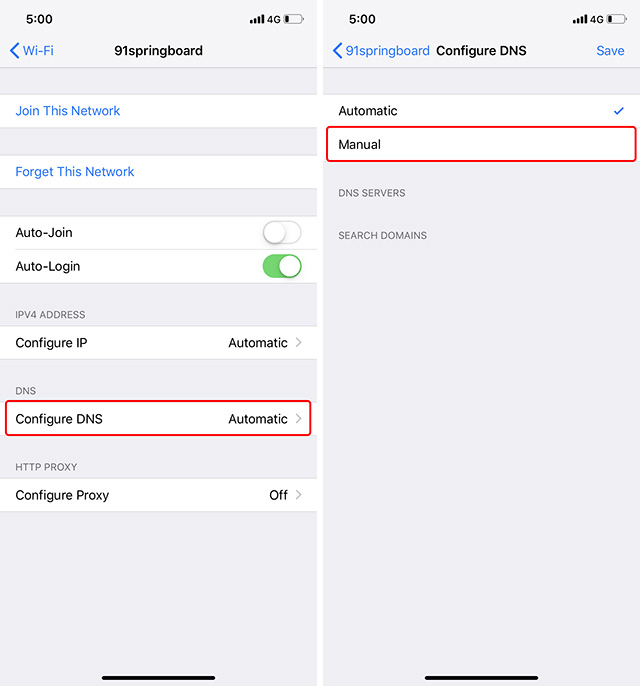
- Delete any existing DNS settings, and then add new DNS records by borer the "+ Add Server" push.
- Add two DNS records: 1.i.1.1 and 1.0.0.ane
- So, add 2 more DNS records: 2606:4700:4700::1111 and 2606:4700:4700::1001
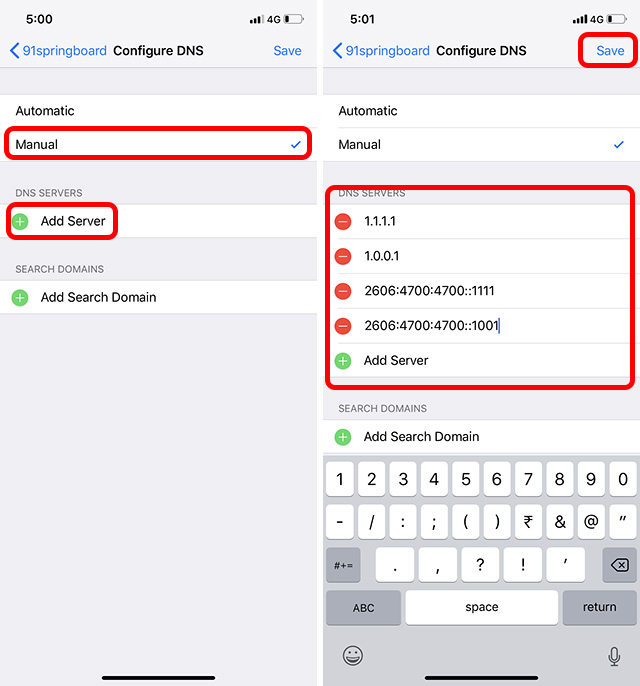
- Tap on the 'Save' push.
That's it, your iPhone volition now apply the 1.one.ane.1 DNS server to admission the cyberspace, and y'all'll be able to scan the internet without worrying about the DNS provider selling your data.
How to Use Cloudflare 1.one.1.i DNS on Android
If you lot're using an Android phone, the method to apply 1.ane.1.1 as your DNS is every bit unproblematic every bit it is on iOS. Merely follow the steps below:
- Install the 1.1.one.ane DNS app on your phone from the Play Store.
- Allow it to create a VPN profile, and so turn the toggle on.
That's it, all your browsing data will now be routed through Cloudflare's i.ane.one.1 DNS servers and you will be able to browse the internet freely.
How to Set Up Your Router to Use 1.ane.ane.1 DNS
If yous're using multiple devices on your network, and you near probably are, it's easier to but change your router'southward settings to apply 1.1.1.1 instead. Fortunately, doing that isn't difficult either. Just follow the steps below and you'll be all set:
- While connected to your WiFi or ethernet network, enter your router's gateway address in the browser. This is normally 192.168.1.ane or 192.168.0.ane. Y'all tin can detect it on your router or by but searching for your router's name and model on Google.
- Locate the DNS settings folio hither and note down the existing DNS settings in case you need to revert back to them afterwards.
- Now supercede those settings with ane.1.1.1 and i.0.0.1 for IPv4, and 2606:4700:4700::1111 and 2606:4700:4700::1001 for IPv6.
- Save your settings and restart your router.
That's it, your router volition now utilise the i.1.1.one DNS to resolve your cyberspace queries and you'll exist able to get unrestricted access to banned websites.
Hands Access Blocked Websites with Cloudflare's one.1.ane.1 DNS
So those were all the ways in which y'all can ready and utilise Cloudflare's 1.1.ane.one DNS service on your devices. Yous can individually prepare 1.ane.one.1 on your devices or you tin can choose to simply change the DNS settings on your router itself to automatically get all your devices to employ the 1.1.1.1 DNS instead of whatever DNS yous're using currently. Hopefully this guide will assistance you use the net unrestricted and without worrying nearly your DNS provider selling your information to 3rd parties. If yous come across whatever problems while setting up the 1.1.i.one DNS on your devices, let united states of america know in the comments downwardly below and we'll try to aid you out.

Source: https://beebom.com/use-cloudflare-dns-visit-blocked-websites/
Posted by: pittmanbech1947.blogspot.com
0 Response to "How to Use Cloudflare 1.1.1.1 DNS to Visit Blocked Websites"
Post a Comment